Thanks to this article at lowendmac.com, you can install Mac OS X 10.5 Leopard (the most modern and last Mac OS to support PowerPC) on macs that don’t meet the 867 MHz CPU requirement the installer checks for. This has been quite handy for my G4 Sawtooth, Mystic and Tangent machines.
Insert the Leopard install DVD. Reboot into Open Firmware by holding down Cmd-Opt-O-F following the tone. At the prompt, type the following exactly:
Single Processor:
dev /cpus/PowerPC,G4@0
d# 867000000 encode-int " clock-frequency" property
boot cd:,\:tbxi
Dual Processors:
dev /cpus/PowerPC,G4@0
d# 867000000 encode-int " clock-frequency" property
dev /cpus/PowerPC,G4@1
d# 867000000 encode-int " clock-frequency" property
boot cd:,\:tbxi
Bingo. The system reboots and passes the CPU speed check the installer performs. This trick will last until the next reboot, when the property returns to normal.
As a happy user of MailServe Pro on Mac OS X 10.5 Leopard “client”, I was assuming my migration to Leopard “Server” would be worthwhile by getting a more capable admin GUI for the built-in Postfix mail server. So far, it’s been a little more complicated than that.
In this configuration, I’m using Dyn Standard SMTP to relay SMTP and configured the 10.5 Server Admin accordingly:
But when I send mail, I get the following error in the SMTP log:
postfix/smtp: warning: SASL authentication failure: No worthy mechs found
Great. After double checking the password, authentication settings, port, etc., it turns out the lovely Server Admin GUI (a major driver for the upgrade) is a little buggy when it comes to editing the Postfix config files. Reading closely in the FAQ from Dyn, you have to manually edit /etc/postfix/main.cf by adding:
Mind you editing config files is exactly what I was hoping to avoid with Server Admin. In fact, this worked fine in the prior setup using the client OS with MailServe, no edit required. I plan to post more about the server setup and why I’ve chosen vintage equipment to run it on, but for now I need to document some of the gotchas of this upgrade. I hope this is the last post!
Unless someone lets me in on an easier process, here are the command line steps to configure a static IP address in Ubuntu Linux (in my case specifically for the BitNami Alfresco appliance):
sudo vi /etc/network/interfaces
For us GUI geeks, pull up a vi refresher if you’re a little rusty. Replace the default line:
So not only will you be able to make payments from your phone – throwing your wallet out the window and creating extra space in your pockets for your hands – the same device will also contain your ID, railcard and all those frustratingly addictive membership and loyalty cards that you can never find when you actually need them.
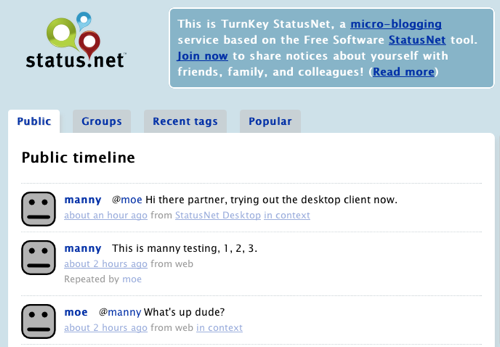
Want a private micro-blogging environment? I’m experimenting in the lab with this Turnkey Linux appliance of StatusNet. The screenshot above shows the public timeline with some test “notices” (as I would guess “tweet” is probably a trademark by now) and “repeated notices”. There is even a desktop client and support for all kinds of features.
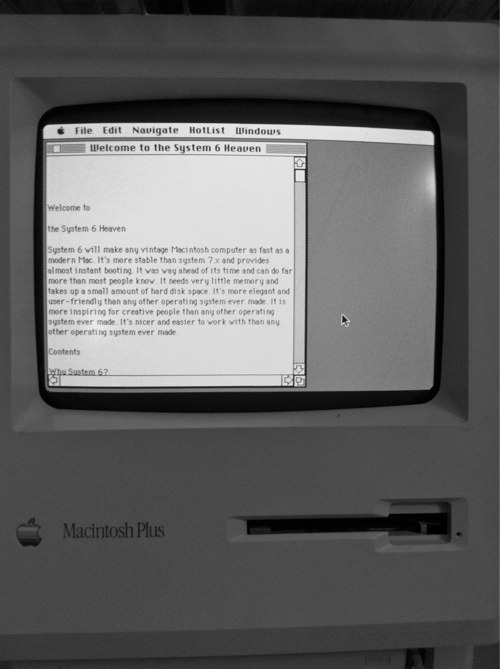
After some serious tinkering, I was finally able to get my original Mac Plus (cira 1986) to surf the web natively. No cheating, no terminal emulation. Just a real web browser running in System 6 accessing the live internet.
Here’s what the System 6 Heaven webpage looks like on the Plus:
Mac Plus Surfing Web, 2010
That’s not just a text file! It’s actually MacWWW, an early web browser (circa 1992) that can run on System 6. For comparison, here is the same webpage in Safari 5: <Photo Missing>
How did I do it?
Well, it was a little tricky since the Mac Plus and System 6 were built before the web, web browsers, home Ethernet LANs and always-on broadband Internet connections were common place (or in some cases even invented). Macs of that time communicated using AppleTalk over LocalTalk networks, both of which are obsolete and no longer even supported by contemporary Mac OS X.
First, I acquired a Quadra 700 for the lab (circa 1992), sort of the Mac Pro of it’s day, since it has ports that support both LocalTalk and Ethernet (using a proprietary Apple AAUI adapter, yes another trip to eBay) and can run System 7. After getting it working on both the modern Ethernet LAN and the vintage LocalTalk network with the Plus on it, the next step was to bridge the two networks using Apple’s (now freely available) LocalTalk Bridge software (the trick being to remember it will always use your printer port for LocalTalk!).
With that in place and working, I could now use AppleTalk file sharing across both networks to easily move all the vintage software around that I needed on the respective systems. It also occurred to me that I should back all this up, given the age of the hard drives and floppy disks, so after exploring open source alternatives like FreeNAS (and learning the vagaries of which versions of AppleTalk are supported by which OSes), I resorted to bringing up a virtual Windows NT 4 Server (cira 1994) with Services for Macintosh. It gave me quite the chuckle that I had to use a Microsoft product to pull this off.
Lastly, I made a clean System 6 install on the Mac Plus and added MacTCP but still needed to get TCP/IP routed over LocalTalk and the bridge on the Quadra. For that, I found IPNetRouter and these instructions which quite frankly required some serious trial and error (the trick there being while you set the bridging machine address as the gateway on the LocalTalk devices, you have to use a real DNS server address).
After some patient tinkering, and many disappointing pings on the Mac Plus, I got it working and fired up MacWWW to find a webpage with no graphics, JavaScript, CSS, Flash, embedded media, or just about any modern element we take for granted. You see the results in the pictures above.
Why did I do it?
Just to see if I could I suppose.
Both my Mac Plus and the early web played an important part in my life and the beginning of my career. I can still recall when NCSA Mosaic was first installed in the university computer lab–after just being told during orientation that most of us would work in jobs that hadn’t been invented yet (which has held true for me). And aside from a brief (and shameful) period during the late 90’s, I’ve always had a Mac.
I had wanted to do this for some time, but it wasn’t until my recent focus on some other vintage technology projects that I got serious. My next task is to get a solid SSH client working on the vintage machines (perhaps for retro Twitter), as well as virtualizing each of them in emulators on my modern systems (so they can live in perpetuity).
Wondering what Twitter might have looked like a few decades ago? Maybe seeking a nostalgic way to get your news headlines? It’s easy to go retro with today’s tools–in this case the Terminal app in Mac OS X and TTYtter, a command line Twitter client written in Perl.
First install and authorize TTYtter as per the instructions on the website (it’s really much simpler than it appears when reading the directions, took maybe 5 minutes including authorization with the Twitter mothership). If you are looking for just news headlines, you might want to setup another Twitter profile to follow just breaking news sources, as TTYtter doesn’t yet support lists.
Then find and install a nice retro font, like the free Teletype 1945-1985 by E.V. Norat II. Next, In Mac OS Terminal, go to Preferences to create a new skin, specifying the new font and a pleasant vintage paper-like color for the background. Play with these settings until you get it to look just how you like.
Finally, open a new shell using the skin you created and run TTYtter for a retro Twitter newswire! Let me know if you can figure out how to add authentic sound effects. Enjoy!